Power Platform: Front-end Authentication to Power Automate with Custom API
This post demonstrates how to securely allow front-end JavaScript to authenticate with Power Automate flows using tokens from a managed identity. By creating a custom API in Dataverse, we can generate and provide these tokens to authorized users only.
This post builds on my previous blogs about managed identity with Power Platform:
Set up managed identity for Power Platform Plugins
Power Platform Plugin Package – Managed identity
Power Platform Plugin - Power Automate with managed identity
You can find example code that I’ve provided on github here
Motivation
While my previous blog showed how plugins can directly call Power Automate flows synchronously, there are scenarios where you need to trigger flows from front-end JavaScript code. For example:
- Model-driven app form javascript or ribbon buttons
- Power Apps Component Framework (PCF) controls
The challenge is securing these calls without exposing credentials in the front-end code. Our solution generates secure tokens on-demand through a privileged Dataverse Custom API.
Solution Architecture
- JavaScript front-end code calls a Custom API in Dataverse
- The Custom API (implemented as a plugin) uses managed identity to generate a token
- The token is returned to the front-end
- Front-end uses the token to directly call Power Automate HTTP flow endpoints
- Access to the Custom API is restricted by Dataverse security privileges
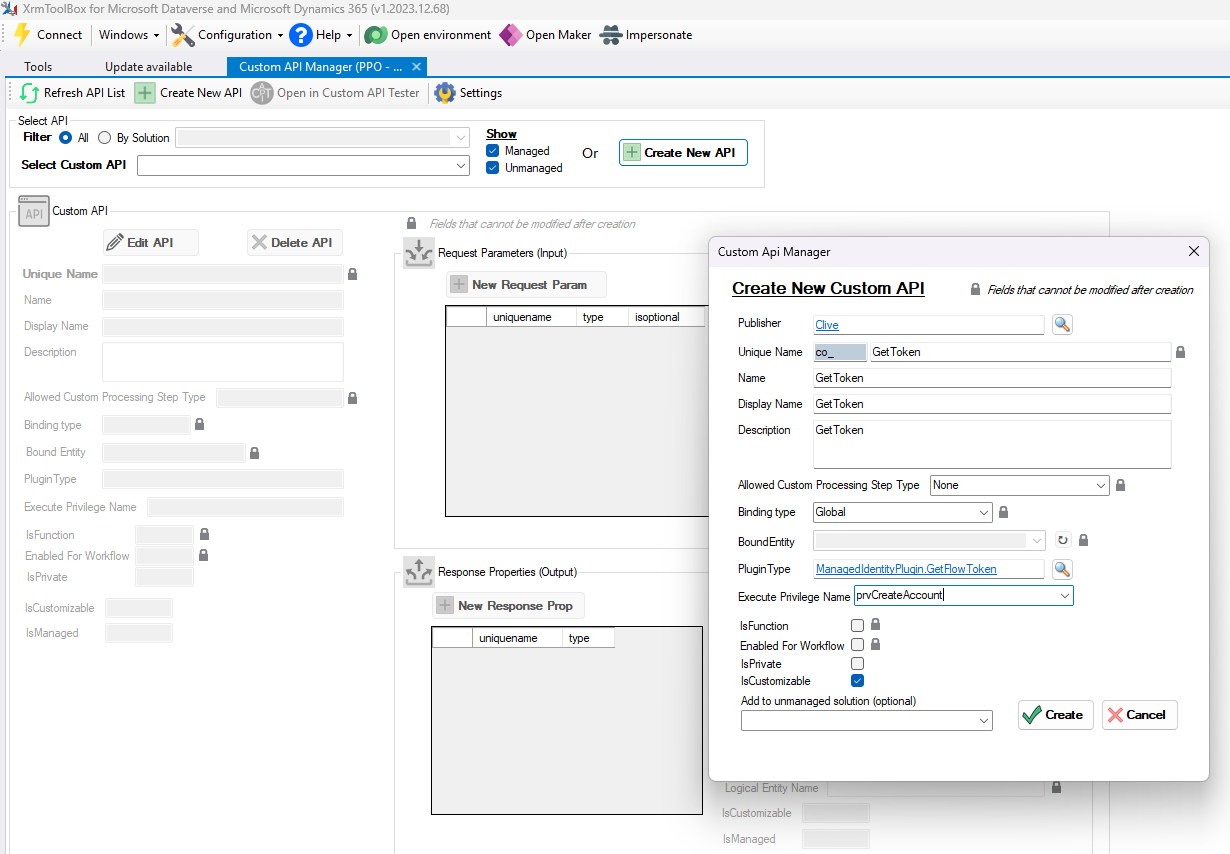
Step 1: Create the Custom API in Dataverse
First, we need to define a Custom API that our front-end code can call to retrieve the token. I’m using an amazing tool by David Rivard in XrmToolbox called Custom API Manager.
It’s a simple custom API co_GetToken that returns a single response parameter of type string called token
You can secure the API by setting a privilege required by the calling user in the Execute Privilege Name field.
Step 3: Implement the Custom API Plugin
Now let’s create the plugin that will generate the token using managed identity and plumb it into our output parameter:
namespace ManagedIdentityPlugin
{
    /// <summary>
    /// Plugin development guide: https://docs.microsoft.com/powerapps/developer/common-data-service/plug-ins
    /// Best practices and guidance: https://docs.microsoft.com/powerapps/developer/common-data-service/best-practices/business-logic/
    /// </summary>
    public class GetFlowToken : PluginBase
    {
        public GetFlowToken(string unsecureConfiguration, string secureConfiguration) : base(typeof(GetFlowToken))
        {
        }

        protected override void ExecuteDataversePlugin(ILocalPluginContext localPluginContext)
        {
            if (localPluginContext == null)
            {
                throw new ArgumentNullException(nameof(localPluginContext));
            }

            var identityService = (IManagedIdentityService)localPluginContext.ServiceProvider.GetService(typeof(IManagedIdentityService));
            var scopes = new List<string> { "https://service.flow.microsoft.com//.default" };
            var token = identityService.AcquireToken(scopes);

            localPluginContext.PluginExecutionContext.OutputParameters["token"] = token;
        }
    }
}
Step 4: Front-end JavaScript to Call Custom API and Flow
Now let’s look at how to call this Custom API from JavaScript and use the token to authenticate to Power Automate.
Note: I decided to not to use Xrm.WebAPI as I find it overkill for this, but typically it should be used.
// Function to get authentication token from our custom API
const GetFlowToken = () => {
  return new Promise((resolve) => {
    fetch("/api/data/v9.0/co_GetToken")
      .then((result) => result.json())
      .then((data) => resolve(data.token))
  });
};

// Function to call Power Automate flow with the token
async function callSecureFlow(flowUrl, token, requestData) {
    try {
        const response = await fetch(flowUrl, {
            method: "POST",
            headers: {
                "Authorization": `Bearer ${token}`,
                "Content-Type": "application/json"
            },
            body: JSON.stringify(requestData)
        });

        if (!response.ok) {
            throw new Error(`Flow returned ${response.status}: ${await response.text()}`);
        }

        return await response.json();
    } catch (error) {
        console.error("Error calling secure flow:", error);
        throw error;
    }
}

// Example usage
async function CallFlow() {
    try {
        // Get token first
        const token = await GetFlowToken();

        // Then call the flow with the token
        const flowUrl = "";
        const result = await callSecureFlow(flowUrl, token);

        // Use the flow response
        return result;
    } catch (error) {
        console.error("Address validation failed:", error);
        throw error;
    }
}
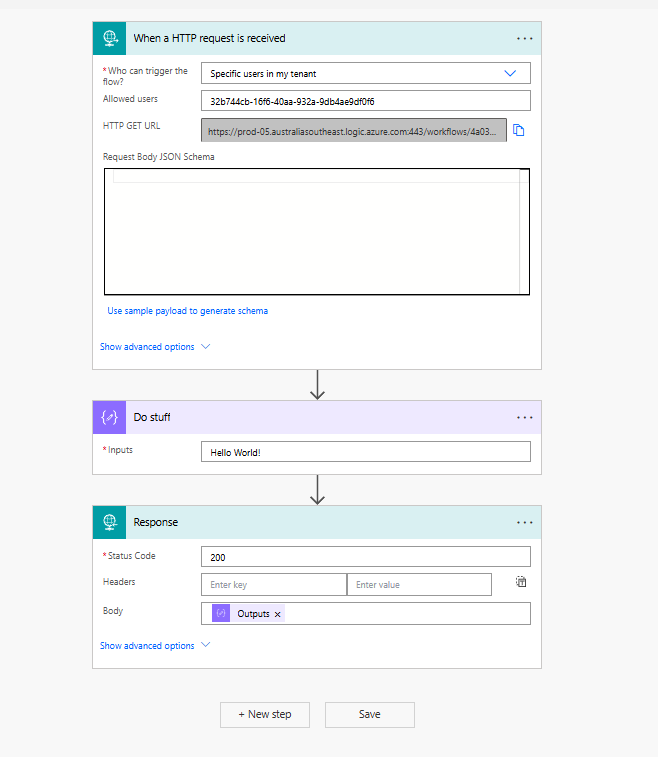
Step 5: Configure Power Automate Flow
Create a Power Automate HTTP trigger flow that is secured with managed identity, similar to the previous blog post:
- Create a new flow with HTTP trigger
- Set authentication to “Specific users in my tenant”
- Enter the Object (principal) ID of your managed identity in the “Allowed users” section
- Configure your flow actions as needed
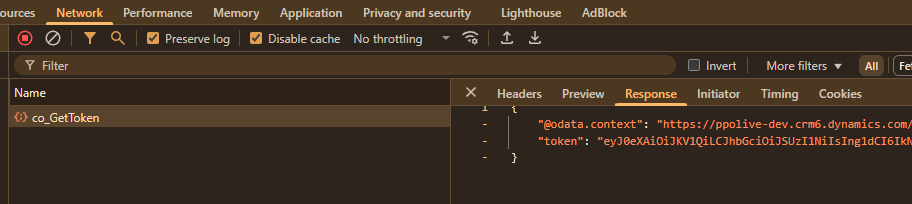
Testing the Solution
To test the complete solution:
- Deploy your plugin with the Custom API
- Assign the relevant privilege to appropriate security roles for testing user
- Deploy your front-end code (form script, PCF control, etc.)
- Run through the user scenario and check browser console logs
- Verify the flow is being triggered successfully
You should see successful authentication to the flow and proper responses being returned to your front-end code.
Security Considerations
This approach maintains security because:
- The managed identity token is never stored in front-end code
- Tokens are generated on-demand and short-lived (typically 1 hour)
- Only users with appropriate privileges can call the token generation API
- The Custom API can include additional logging and security checks
- Power Automate flows remain secured by the managed identity
Conclusion
By combining Custom APIs, managed identity, and proper privilege controls, you can enable secure front-end integration with Power Automate while maintaining robust security. This approach leverages the strengths of both Power Platform security and managed identity authentication without exposing credentials.
This pattern can be extended for various scenarios where real-time interaction between front-end components and backend services is needed while maintaining proper security controls.
I hope this helps in your Power Platform integration projects. Feel free to reach out with any questions or share how you’ve applied this approach in your solutions!